Get out of my shot…

A pretty common occurrence at popular scenic viewpoints, someone is standing with their tripod setup right where you want to be. Other photographers wander through and sometimes even setup right in front of you without looking. I can think of a couple ways to avoid that, go mid-week or get there when everyone else is sleeping or has gone home. Or better yet, find a different spot with a different perspective on the subject, you go home with a shot no one else has.

_1007852-800
But here is something a little different, YOU get in your own shots. What… you ask  while scratching your head?
It took me a while to start thinking about this before I arrived at a location. Of course, none of these things ever happened to me Winking smile.
You wander around looking for a great composition and when you finally find the perfect spot, set up your camera and look through the view finder only to see there are great big clown size footprints right in the middle of your composition. Ok, who was the idiot that walked right through here??? Looking around only to find you are the only one there… Oops, way to go smarty pants. It helps to think about where you might setup ahead of time, preferably before you walk through that snow or sand.
How about this one, you are shooting in portrait orientation with the ultra-wide angle lens. You get some outstanding shots, at least so the camera LCD says, and cant wait to get home and see these beauties on that great BIG custom calibrated monitor you spent a month researching information on the internet before you bought. So there it is, The shot, but wait, what is that at the very bottom of the frame? Could that be a tripod foot? Doh… You didn’t even think of checking the bottom of the view finder while positioning your camera. This last one usually isn’t a problem unless you are using something wider than 17mm on a full 35mm format camera of 12mm on a cropped sensor camera. Of course, like I said, this has never happened to me.

_1007760-800

Geez, and all I thought I had to do was get to a pretty location at the right time of day and snap the picture. Now you want me to think about where I walk, or double check the view finder all before I have had my morning coffee?
Next you’ll be asking if I remembered to charge my batteries…
About the pictures; the first was shot using a Nikon D3x and the AF-S 24-120 f4 at 38mm using a Singh-Ray circular polarizer to help cut some of the glare from the water and rocks. The second was shot with the Nikon D3x and the AF-S 16-35 f4 at 16mm.

Nikon AF-S 24-120 f4 review for Landscape Photography

I recently rented the new Nikkor AF-S 24-120 f4 to see how well it would work as a landscape lens. I had read some mixed reviews about the lens but no one has really tested it from a landscape perspective. The focal ranges I normally use are 16mm to about 125mm. I have 2 lenses I carry all the time (Nikkor’s AF-S 16-35 f4 and AF-S 70-300 VR)  and a 3rd (Nikkor AF-S28-70 f2.8) I use sometimes. The focal range of this new lens would compliment my 16-35 and reduce the lenses I carry to 2. Another benefit would be a bit of weight reduction in my backpack. The Nikkor AF-S 28-70 is a very large and heavy lens, while image quality is great, I 81B2vJYZyNL__AA1500_would not miss having to carry it while backpacking. The Nikkor AF-S 24-120 f4 wont be replacing my 16-35, but I was curious how it would compare at 24mm if switching lenses in a nasty environment wasn’t an option. I also compared the Nikkor AF-S 24-120 f4 to the AF-S 28-70 f2.8 at 28mm and 50mm, and the AF-S 70-300 VR at 70mm, 85mm, and 120mm. The images posted are all at f11, though I am shooting the same shots at f8 also. Since I am looking at this from a landscape perspective, I wasn’t concerned with larger f stops. Shots posted are 200% crops for your pixel peeping benefit Winking smile
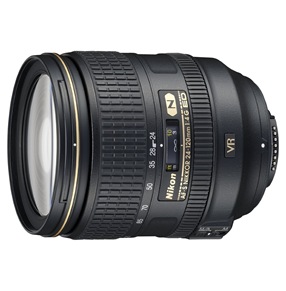
Testing was done using a Nikon D3x mounted on a tripod, mirror lock up, cable release and Live View contrast detect focus. I was shooting at f8 and f11 and pixel peeping at 200% The shots were taken in RAW and no extra processing other than my normal ACR settings or sharpening was applied other than adjusting very slight exposure changes.
The images are posted HERE. My expectations weren't high considering the bashing this lens was getting (mostly from people who had not tested it.) My initial impression is, I don't see what all the fuss on build quality is about. It is similar to the feel of the AF-S 16-35 f4, the Nikkor AF-S 24-120 f4 internal sleeve is metal. It appears it will withstand my abuse as the AF-S 16-35 f4 does and I can be pretty hard on gear. It is very solid feeling when zooming. I don't get the plasticy (is that a word? ) feeling of my AF-S 70-300 VR. I think the build quality is quite good. The 24-120 does have a decent amount of barrel distortion improving all the way to 35mm where there is no distortion. As I zoomed further it changes to some minor pin cushion all the way to 120mm.
Testing at 24mm, the Nikkor AF-S 24-120 f4 is better than I was expecting, the center sharpness looks very close to the AF-S 16-35 f4 seeming ever so slightly sharper due to a little better micro contrast. They are close enough to not worry about (remember, 200% pixel peeping).
(When I refer to micro contrast or lens contrast it is a reference to sharpness, not like the contrast which distributes tonal gradation from black to white or lightest to darkest. Here is a good article explaining lens contrast). At f8 The 16-35 is better in the edge/corner department as I expected and the 24-120 has a bit of CA as does the 16-35 but the 16-35 CA is negligible. The 16-35 has nice clean straight lines and the 24-120 quite a bit of barrel distortion, no surprise here. At f11 there doesn't seem to be much change except edge/corner performance, the 16-35 improves and the 24-120 stays about the same.

Against the the 28-70, at 28mm, center performance is similar but the corners are much better with the 24-120. My eyes give a slight edge to the 24-120 in the center but it is very close. Both have a decent amount of CA of different type. The 24-120 still displays a bit of barrel distortion at 28mm and changes to pin cushion which showed up in my 50mm comparison. The 24-120 is the winner at 28mm. At 50mm the 24-120 had a repeat performance. I am satisfied the 24-120 could easily replace my 28-70 and give me better results.

At 70mm, compared to the 70-300 VR at f11 in the center, the 24-120 has a slight advantage, corners were too close to call. the 70-300 has always impressed me with it's corner performance and one of the reason I carry it over my AF 80-200 f2.8 (besides weight). At 85mm, the 70-300 has better corners, the 24-120 corners are very good, just not as good as the 70-300. The center frame comparison is the opposite with the 24-120 coming out on top nicely. Most of the CA has disappeared as well. Images at 120mm are close to the same results as 85 with the 24-120 corners not quite as good but still not bad and the center, the 24-120 is better. The 70-300 has virtually no CA and the 24-120 has a tiny bit.

Verdict: I think this lens will be a nice upgrade for a light landscape photography kit with the AF-S 16-35 f4 and the Nikkor AF-S 24-120 f4.

LIGHT……

You are at a great location, you have your camera setup and a perfect composition through the view finder. What will turn a good image into a great one? Light…. it is why landscape photographers get up before the sun rises and make long treks early in the morning. It is why they spend hours at mid-day scouting for locations to use for morning or evening. It is why they walk back from an evening location for hours with a headlamp on.

You can use light to highlight elements within a scene such as this.

_1007657-750

You can use light to light up the clouds in the evening.

_1006965-700

On an overcast day you can use light in a scene so everything is lit more evenly.

_1001527 700

But it is all about light. Next time you go out looking for that great shot, think about how light will affect it. Think about shadows, highlights, reflections… use it to your advantage. Most of all, be patient. Light changes, you need to be there when it does.

Central Oregon Coast

_1007176-800During the month of September I spent some time on the Central Oregon Coast. The first trip was to do a little exploring since I have not been there before…. My bad! I went a second time to explore some more and capture a few shots. For me, to get decent photographs, I have to visit a location more than once. I go at first to find the area and get a feel for what type of photography I can expect. If I happen to get lucky, I might even get a nice shot. In the case of the coast, I want to get a feel for tides and how the sun looks against the coast. Knowing how a location looks at high tide and low tide tells me when the best time to be there is. Some areas look better at high tide, some at low, others have photographic opportunities at both. Some other questions I get answered are “how does this location look in the morning? How about in the evening?”

All these questions and exploring help plan your time wisely. Four things I always look at before heading out; Tide tables for the areas and weather, sunrise and sunset as well as moon rise and set. All four of those are important and can help decide if a trip was a success or a bust. And if the weather looks bad, that can mean photography is good. Nothing is more boring than a cloudless blue sky.

_1007022-700

A word of caution, if you like keeping your camera gear pristine, shooting at the ocean is probably not a good idea. My gear can get wet, and I spend time keeping the salt film wiped from my camera and filters. I wear glasses, which get coated too, though they help keep me aware of when it is time to wipe the lens. I usually try and keep my polarizer on the lens, since my Singh-Ray circular polarizer wipes clean easier than the front element does. After shooting, my equipment is fine, but if you get nervous about that type of thing you might be better off shooting something else.

The photograph at the top is a good example of wiping the lens to keep it as clean as possible. I also had to keep an eye out for large waves as I was standing very exposed to incoming waves. Though the spray and the mist made for a nice extra glow around the water.

The next shot is Cannon Beach and Haystack Rock. I used a 3 stop Graduated Neutral Density Filter and a wide angle lens. What first attracted me to this location was the fingers of water pointing at the rock, but when I got there the ripples in the sand looked like they would catch the sun so I included them in the composition.

_1007479-800


This third shot was screaming black and white to me. I converted it in Photoshop and did a little dodging and burning as well as contrast enhancement. This was another occasion where I had to keep the filter wiped constantly, though it was a 3 stop Soft Graduated Neutral Density one and no polarizer. I kept the lens cap on between shots.


This last one was taken right before sunrise, so the slow exposure gave the water a mist like look. I also used a Circular Polarizer so the tiny bit of reflection from some of the wet rocks and water weren't so obvious and to help slow the shutter speed a bit more.

_1007193-700